Carding Instructions - *We are away until 22nd of February and will dispatched your order on the 23rd* High‑Quality Needle Felting Kits, Wet Felting Kits, and a Large Selection of Felting Supplies. Explore Felting Wool and the UK’s Biggest Range of Needle Felting Needles. All UK orders are sent by 1st Class Post, with Freepost on orders over £25 using discount code UKFREEPOST25* (U.K customers only). Unwind With Wool.
Carding Instructions
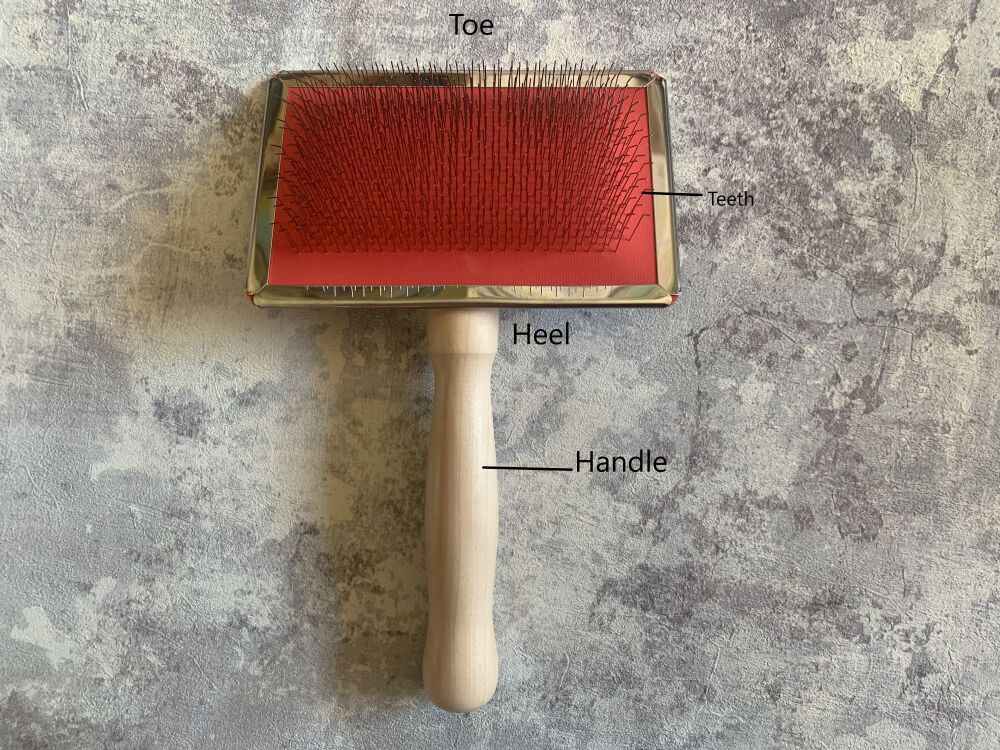
Carding wool is a way to brush the fibres to make them easy to manage in preparation for spinning or felting. Below are the named parts of the carder.

Step 1 Charging the Carder
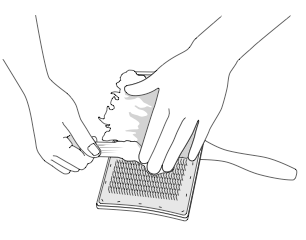
Hold one carder flat on your lap, take a piece of wool and place fibres on to the carder by pressing down or dragging the wool over the teeth of the carder.
The ends of the fibres should be at the handle end of the carder. Cover the carder from one side to the other. Try not to overfill the carder as this will make carding difficult.

Step 2 Combing and Mixing
Hold the charged carder in your hand, resting it on your thigh. With your smallest finger near the heel of the carder fingers facing upwards, take the second empty carder, and with the teeth facing down gently brush it over the fibres, starting with the toe end. Brush with an upward flick, so the next set of fibres are in a good position to card again, removing the need to grind the carder together to get at the fibres of the charged carder.

Moving with each brush to the heel end, so the carders fully overlap. Continue until most of the fibre has been brushed onto the other carder (if there are some stubborn wisps, remove these and put them on the other carder by placing the toe end of the nearly empty carder (the teeth of both carders are facing the same direction) at the heel end of the newly filled carder and gently move the carder down the length and the fibre will move easily on to the full carder. Repeat if needed.

Step 3 Blending
repeat step two with your newly filled carder, this step can be repeated a few times until you are happy with the fibres.
Step 4 Emptying the carders and Making a Rolag
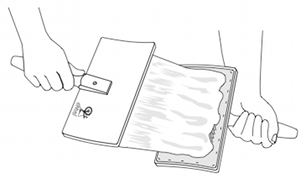
Hold the empty carder on your lap, place the toe end of the full carder on top with its back facing the teeth of the empty carder underneath. Then, catching the first fibres onto the heel end of the empty carder, move the top carder along the length of the bottom carder. You can also use your hands to guide the fibre to sit on top of the bottom carder. The carded fibres will now be sitting on top of the carder. Take hold of the fibres at the toe end of the carder and roll up with your fingers along the teeth of the carder. Roll the roll once along the teeth to get a nice tube of fibres, the roll is called a Rolag.


Step 5 Creating Yarn
To use the wool from your rolag gently pull from one end to create a long piece of wool, be careful not to over pull as this will cause the break in the wool. The yarn if ready for felting or spinning.

See our hand carders here
Sorry, no products were found in this category.
Carding Instructions
Carding wool is a way to brush the fibres to make them easy to manage in preparation for spinning or felting. Below are the named parts of the carder.

Step 1 Charging the Carder
Hold one carder flat on your lap, take a piece of wool and place fibres on to the carder by pressing down or dragging the wool over the teeth of the carder.
The ends of the fibres should be at the handle end of the carder. Cover the carder from one side to the other. Try not to overfill the carder as this will make carding difficult.

Step 2 Combing and Mixing
Hold the charged carder in your hand, resting it on your thigh. With your smallest finger near the heel of the carder fingers facing upwards, take the second empty carder, and with the teeth facing down gently brush it over the fibres, starting with the toe end. Brush with an upward flick, so the next set of fibres are in a good position to card again, removing the need to grind the carder together to get at the fibres of the charged carder.

Moving with each brush to the heel end, so the carders fully overlap. Continue until most of the fibre has been brushed onto the other carder (if there are some stubborn wisps, remove these and put them on the other carder by placing the toe end of the nearly empty carder (the teeth of both carders are facing the same direction) at the heel end of the newly filled carder and gently move the carder down the length and the fibre will move easily on to the full carder. Repeat if needed.

Step 3 Blending
repeat step two with your newly filled carder, this step can be repeated a few times until you are happy with the fibres.
Step 4 Emptying the carders and Making a Rolag
Hold the empty carder on your lap, place the toe end of the full carder on top with its back facing the teeth of the empty carder underneath. Then, catching the first fibres onto the heel end of the empty carder, move the top carder along the length of the bottom carder. You can also use your hands to guide the fibre to sit on top of the bottom carder. The carded fibres will now be sitting on top of the carder. Take hold of the fibres at the toe end of the carder and roll up with your fingers along the teeth of the carder. Roll the roll once along the teeth to get a nice tube of fibres, the roll is called a Rolag.


Step 5 Creating Yarn
To use the wool from your rolag gently pull from one end to create a long piece of wool, be careful not to over pull as this will cause the break in the wool. The yarn if ready for felting or spinning.

See our hand carders here
