
The Woolsmith’s Handbook Blog

Welcome to the Heidifeathers Blog — your hub for needle felting tutorials, wet felting guides, felting wool types, felting needles, felting tools, and felting supplies for beginners and advanced makers. Explore core wool, tops, batts, armature techniques, colour blending, shaping methods, detail work, and finishing techniques designed to improve structure, texture, and precision in every needle felting and wet felting project. Each tutorial includes direct links to the exact felting materials, felting needles, wool fibres, and tools used, helping you learn, refine, and build confident, professional felting results.

We’re here to guide your felting step by step, cheer on your makes, and encourage you to stretch your skills with new wool, new tools, and new techniques. Whatever you’re learning next, you’ll always have clear tutorials, practical tips, and steady support. xx

Needle Felting Ears

Posted on
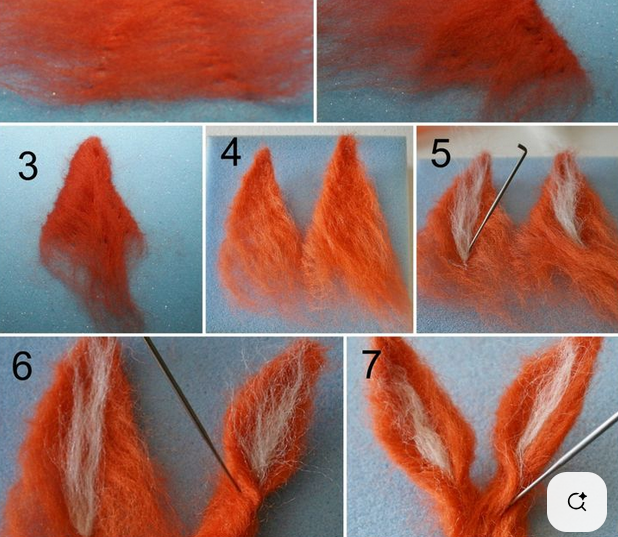
Screenshot 2025-07-17 105939

Image Lincolnshire Fern Crafts

Part of our Felting a face series, we are looking at making ears

Basic Steps to Create Ears 

  1. Shape the Wool
    Pull off a small amount of wool and shape it into a leaf or triangle, depending on the ear style (e.g. bunny, fox, sheep).
  2. Outline and Felt
    Use your needle to outline the shape on your foam pad. Felt gently around the edges to define the ear.
  3. Firm Up the Shape
    Fold the sides inward and felt repeatedly to create a clean, firm structure. Pinch the base slightly to give it dimension.
  4. Add Details
    Use coloured wool to add inner ear shading or texture. Felt lightly to blend it in without poking through.
  5. Attach the Ears
    Leave the base of the ear loose so you can felt it directly onto the head. Position carefully and felt around the base to secure.
 
Here are some great video tutorials 

Fit to be Loved tutorial on cat ears

Lincolnshire Fern Crafts tutorial rabbit ears

Leightfootfelts tutorial human ears